


This tutorial will show you how to create a Shopify shop from scratch. We will guide you through all the steps in a straightforward, non-jargon way. This will help you to get your shop live quickly and easily.
We’ll also give you some tips at the end to help make your new ecommerce business a success.
Tip for Success:
For a ‘quickstart guide’ to the key steps in setting up your Shopify store you can watch the video below. But for a detailed overview I would recommend reading this entire post. Do both for the best results!
1. Get everything you need for your Shopify store ready
It’s best to prepare everything for your Shopify store before you start selling. This will help speed up the building process and make it look better.
You’ll need:
- An idea for a business
- A powerful business name
- A Logo
- Products
- Images of your product
- Content for your store’s pages (about us, contact us, FAQs etc. )
2. Start a free trial
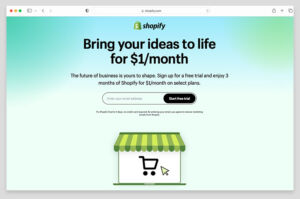
Launch your free Shopify trial. After the three-day free trial, you’ll only have to pay $1 per month until the end of the first three months for a Shopify membership.
This is the Shopify sign-up page for a free trial.
There are two different types of Shopify trials to choose from: the regular trial and a dropshipping one. This trial gives you access a variety of dropshipping tools that will help you get started with a dropshipping company.
These links will allow you to access the two trials:
- Regular Shopify Trial
- Dropshipping starter kit trial
No credit card information is required to start your Shopify trial. However, you may be asked some questions.
The most important of these is what you’d like your store name to be, because it will form your default Shopify URL (i.e., ‘yourstorename.myshopify.com‘).
It’s okay if you don’t have a store name or URL in mind at this point. Shopify will generate one for you. ).
You can also change the URL if you let Shopify create it for you. However, this can only be done once. If you choose to name your shop during the trial period, you will not be able to change it afterward.
You can always buy a domain name for your own shopify plan, e.g. yourstorename.com, and your customers will see this address instead of the one from’myshopify.’
Create your Shopify account
After you answer Shopify’s questions you will be redirected to your new Shopify account.
You can now start adding products. Select a theme, and set up your payment and delivery options.
Inside your new Shopify account
Start with the “adding products” bit.
3. Add products to your Shopify store
After signing up for a Shopify trial, you may be tempted by free themes, and to play around with the design of your new store.
This can be the best part of opening a Shopify shop! ).
It’s important to keep in mind that the product images you choose will impact the overall look and feel of your shop. You don’t want to spend a lot of time customizing your theme, only to discover later that it doesn’t go well with your products.
Idealistically, your store should be designed around your products and not the opposite.
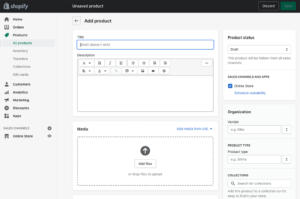
Shopify Dashboard: To add your first item, go to Product > Add your products.
Adding products to your Shopify store
It’s time to add the most important information about your product.
- product title
- Description
- Media
- pricing
- inventory
- Shipping
- Variations
- Search engine listing Preview
Let’s quickly go through them.
Product title
Your customers will see this when they find your product in Google or your own ecommerce website store.
Your title should be
- Clearing up the confusion
- You can also find out more about the accuracy of this website.
- engaging
- The length of this article is relatively short.
Product description
You can use this field to sell your products!
It’s important to not write a long blurb about how wonderful it is — . You need to be strategic.
When writing product descriptions, you should…
- Know your buyer’s persona – that is, the type of person most likely to browse your store. Your product descriptions should be tailored to speak directly to your target market in an appropriate and clear manner.
- Make it easy for customers to understand your product descriptions – use bullet points, headings and short paragraphs.
- Highlight any unique features (USPs), which distinguish your product from similar products. Include any special offers or incentives associated with your products (discount codes and free shipping, for example). ).
- Overcome objections – Try to understand why a customer might be nervous about paying for your product and offer reassurances that will calm their nerves.
Media products
You can add images, video or 3D model to your product pages.
Adding product media
When uploading media, there are some important things to keep in mind.
- Make sure that your product media are of the highest quality possible. You should work with a professional videographer or photographer to create your product media. You can take your own photos and videos if that is not an option. Just make sure you use a camera with high-quality. Shopify allows you to upload videos in up to 4K quality, so go wild! ).
- Use the same aspect proportion for uploading photos of products. Shopify themes will look more appealing when you use a consistent ratio.
- Know the image resolution requirements – for Shopify’s zoom feature, images must be at least 800 x 800-pixels in resolution. If you are using Shopify to make sales online through Amazon and Etsy then they should be at least 1000×1000 pixels. Shopify recommends using images with a minimum of 2048 pixels in width ( . You can read Shopify’s advice about product images here).
- Once you have uploaded an image of a product, then add the alt text. Alt text helps visitors with visual impairments better understand your content, while also helping search engines index it.
- Be aware of video file size and length. If you upload your own product videos on Shopify, (rather than embedding YouTube or Vimeo ones), ensure that the videos are no longer than 10 minutes and do not exceed 1GB.
Pricing

It’s time to decide the price of your product!
You should aim to achieve a balance when setting the price of an item.
- Your costs – Employee costs, raw material costs, shipping costs, rent, etc.
- The ‘perceived’ value of the product that you are selling.
If you price things too high, you will not generate enough sales for a profit.
Making things too inexpensive in comparison with similar products may cause your customers to doubt the quality of what they’re buying online. (If something sounds too good, it probably is).
It can be difficult to price products, but there is a lot of room for error. You can test the market by setting a price and then changing it later, based on your results.
You can easily add your product’s price to Shopify once you have decided on it. Just enter the price in the ‘price field’ on your product’s page.
Adding pricing details to a Shopify product
You can enter any value you want in the ‘compare price’ option. Your visitors will know the full price of the item, and the price’ will appear as a discounted rate.
Entering $3 in the price field and $5 in the compare at price field will display your store’s visitors with something similar to this:
Shopify’s “Compare Price” feature in action
It is optional to add the cost of an item in Shopify. This allows you to calculate your profit per sale.
This is helpful for reporting purposes.
The tax status, product type and location will all influence whether you should tick the box.
You can change your tax settings at a later date if you decide to charge taxes on your products.
Inventory
This section on the product page allows you to keep track of your inventory and tells Shopify what you should do if a product is out of stock.
Adding inventory information to products in Shopify.
Shopify’s inventory settings
The information you enter will depend on the type of product (physical, electronic etc.). You can add your own information in the fields provided.
- Stock Keeping Units (or SKUs – a code for a product)
- bar codes
- Quantity Information
- Location of your inventory
Shopify will ask you what you want to do if your stock runs out.
It’s best to select the ‘continue’ option if you don’t need to source or make your product for a long time. However, if you will take some time to obtain more stock, you should leave the box unticked.
Shopify can tell you how many products are stored at each location if you use multiple locations. (You can read more about how Shopify stores, and inventory locations here.
Shipping
You can enter the weight and customs details in the Shipping section if you are selling physical goods.
Add shipping options
Weight data is important when calculating shipping costs (I will explain how to do this later in this article).
Variations of the same product
This is the place to add all of your options, such as different sizes, colors, or flavors (alongside their prices, quantities, and SKUs).
Editing product variants on Shopify
For each Shopify item, you can create up three options (for example, size, color and material) as well as up to 100 variants.
variants are combinations product options. For example, a large blue shoe is one; a smaller red shoe, another.
Tip : If these product and variation limits are too restrictive, you might need to purchase a relevant app in Shopify’s app store. Infinite Options has been a popular option.
Search engine listing Preview
You can tell the search engines more about you and your products by using this section.
SEO settings for Shopify products
You will need to fill out 3 fields:
- Page title – This is the title which appears on search results.
- Meta description – This is where you put your “meta description”, a bit of information displayed in the search results. (Though not always — Google uses it more as a guide than a gospel).
- URL/handle – the web address of your product.
Here are a few key points to consider:
Before naming your product, you should do some keyword research. You can use keyword research tools such as Ahrefs and Semrush to find out what people search for when looking for similar products. They will also tell you how many searches are made per month, how hard it is to rank for those phrases. You might find out, for example, that 64,000 searches are made for “ketchup” every month. However, only 5,000 are done for “red sauce”. This means that ranking highly for red sauce is easier.
- Use your keyword as the URL. It will help Google index your product more accurately.
- Your meta description should be between 155 and 160 characters. Keep your meta description short, sweet, and engaging. This will encourage more clicks. Google may not use longer meta descriptions, or they may be truncated.
Product Organization
You’ll see a section called ‘Product Organization” on the right-hand side of the page.
You can add product information to make it easier for you to create collections and discounts.
Shopify allows you to organize your products.
You will need to complete the following fields:
- Product category — The main category of the product.
- Product Type — The specific type of product to be sold
- Vendor – the manufacturer or seller (in many cases, this is you).
- Collections – We’ll get back to them in a minute, but they are basically catalogs of products you can create manually or by using rules. Collections can be displayed in a variety of ways in your store, such as on the home page or navigation.
- Tags – these are keywords you can use to associate your products. These tags are important because they can be used to create collections automatically and help customers find products easier when searching your Shopify store.
Product Status
This can be used to activate the product once you are happy with your product information.
Set the ‘product status’ box at the top-right corner of the screen to active.
Product Status
You can also manage the availability of your product on different ‘sales channels’ and ‘apps’.
You will activate the product by default on your Shopify store. However, if you use Shopify to list the product on another platform, you can also click on the “manage” link to enable it on that channel (you can read more about Shopify’s sales channels here).
4. Create product collections for your store
You can create ‘collections’ once you have added some products to your Shopify store.
Collections are groups that contain similar products. For example, if your online greetings store sold cards, you could create a collection of birthday cards, or a collection of Christmas cards.
Three main reasons are there for you to consider this:
- to display a specific selection of products in your store’s homepage
- Create a Link in Your Site Navigation To A Specific Set of Products
- discounts on a particular selection of products.
Click ‘Create Collection’ in Products to create a collection.
Create product collections with Shopify
You can create a collection page by entering a title, description and collection image. SEO information is also entered.
You should pay special attention to the “Collection type” box. You can choose to create a collection either manually or automatically.
Selecting collection type
You can add products manually by selecting the “manual” option.
You will be asked to create some simple rules for your collection if you select the “automated” option.
Creating automated collections
In the example above, we create a collection of Christmas cards based on a product tag. Each time a product has the tag ‘Christmas Card’, it will be automatically added to this collection.
These rules don’t limit you to product tags. You can also use other attributes, such as product title, type and vendor.
Options for creating automated collections in Shopify
Shopify’s ‘automated collections’ feature is my favorite. Most other platforms restrict you to manual collection only.
Automated collections are a great way to save time, particularly if you have a large inventory of products. So make the most out of them!
5. Create your store pages
You’re probably eager to explore the Shopify theme store, and choose a stunning template for your online store.
The best thing you can do is to create pages for your store. This will help your various sales channels in the long run too.
If you already have the main site content in place before applying themes, you will be able to get a better idea of which templates are best for your shop.
You will need to create the following pages:
- About Us — An overview of your online business, values and story.
- FAQs – a page that answers frequently asked questions regarding your product.
- Policy Pages — A website’s terms and conditions, privacy notices, shipping policies, return policies, etc.
- Contact Page — A page that contains your phone number, email address and contact form.
- A Blog – This allows you to share news or content related to your business that may be of interest to your customers.
You’ll notice that the home page is not included in this list. It’s because the home page is a page you should add to after has been selected, since it requires more work with your theme’s customizer. This will be covered in more detail shortly.
All these pages, except for the blog can be created the same way. Click ‘Add Page’ in Online Shop > Pages.
Adding a page to a Shopify store
Then, you’ll need to fill in the blanks – your page title and content, as well as SEO information.
When creating your contact pages, you should be aware of the option ‘theme templates’. This will need to be set to ‘contacts’.
To create blog posts, go to Store > Blog Posts. Click ‘Create Blog Post’.
You can add more content as your shop grows.
6. Create your navigation menus
After you have your pages and products in place, create your navigation menus.
You can add navigation to your Shopify store by going to Store Online > Navigation. Then, you’ll find two options to edit: the ‘footer’ menu and the ‘main’ menu.
Shopify menus
The’main menu” is important at this time. You will be able to add your pages or collections to the main menu by clicking on the link.
Adding items to the main menu
Once you are done, click on the “Save menu” option.
You can also use this section to create more complex menus, such as nested menus or menus in the footer, sidebar, or other areas. Shopify’s navigation provides more information on menu creation.
7. Select a theme
You’ve now got all your pages, collections, products and main navigation sorted. It’s time to choose your Shopify theme.
You can do this by visiting the Shopify theme shop . There you will find a wide range of themes.
Choosing a theme from the Shopify theme shop.
The Shopify theme shop is organized in a manner that makes it easy to find the perfect template for your online business: you can search using filters such as price, industry and catalog size.
There are a few things you should consider when choosing a theme:
- Do not let colors and fonts influence your theme choice too much – these can be easily edited once you have installed the theme. Make sure that the theme you choose has all of the features that you require (such as specific layouts, search bar etc.). For now, it’s more important.
- Check out the different versions of most themes before choosing one.
- Try out paid themes to see what they look like before purchasing them. It’s worth noting, too, that the one-time fees listed for paid themes are not monthly charges.
8. Create your home page
It’s now time to build your Shopify store’s homepage.
Click the “Customize” button under Online Shop > Themes. You will be taken to a drag and drop editor for your homepage.
Shopify themes vary in their default layouts and options, but they all allow you to add sections such as:
- hero images
- Slideshows
- Collections of featured products
- Images
- Text
- Newsletter Sign-up Forms
- Featured Products
Creating a home page for a Shopify store
Keep things simple – Don’t overload your visitors with information.
Avoid clutter, and make it easy for potential customers to locate what they are looking for.
Why not do some user testing?
It’s easy to lose sight of the quality and perspective when you build your own online shop. When you have a draft ready of your homepage, ask a few friends for feedback to see if it is attractive and easy to use.
You can ask your friends, colleagues or members of Facebook groups for their opinions.
Spend a little more time on the element that people keep pointing out as being in need of improvement.
9. Apply your brand
It’s now time to customize your shop with your logo, typefaces, and colors – the core elements of your brand.
Add a logo to Shopify
Click on the “Header” option in Online Shop > Themes > Customize to add a store logo.
Accessing the header in the Shopify theme customizer
You can then upload your logo to your store.
Uploading your Shopify logo file
Customizing fonts and colors
Click the “Theme Settings” paintbrush icon at the top-left corner of the screen to customize the typefaces and colours.
Theme settings can be accessed
Click on the color and typography buttons to make changes. (These will appear at the top of the screen).
Shopify theme settings
You can easily edit these elements by clicking on the element you wish to modify and then using the provided controls.
Changing text color in Shopify’s theme settings
Consider these tips when choosing colors and fonts.
- Research how typefaces and colors work togetherr, or even better, involve a designer. A designer can give you clear advice on font and color combinations, saving you time and helping you achieve a professional result.
- Don’t forget Accessibility when choosing a color scheme. If you choose a light color for the font and place it on a lighter background, then your visitors will have a much more difficult time reading your content (and this is especially true for those who are visually impaired).
- If you aren’t confident with your color and font choices, you should keep things simple. In many cases, a monochrome scheme with sans serif typefaces will look more professional than a scheme with a bright color scheme and ornate fonts.
- Use only one font. It will improve the user experience by reducing the loading time.
10. Set up your shipping rates
Now that you have your product, content, and design in place, now it’s time to think about the operational aspect of .
- How you will deliver your product to your customers
- How much tax do you need to charge them?
- How you will accept online payments.
Start with shipping
You can access your shipping options by going to Settings > Delivery and Shipping on your Shopify dashboard.
Configuring a shipping zone in Shopify
You can set up different shipping rates.
- Flat Shipping Rates — A rate per item, not based on the product’s price or weight
- Rates based on weight or price
- Calculated Shipping Rates — The rates are calculated at the checkout by the postal service based on weight and size.
- Free Shipping Rates — The customer does not pay for shipping (i.e. it is included in the price of the product)
- local pickup or delivery.
The best option for you depends on your product, the packaging cost and your typical customers’ shipping destinations.
If you do not get the shipping zones and rates correct at first, it is possible to go back and adjust your shipping rules.
Reduce shipping costs with Shopify Shipping
Shopify Shipping, a partnership between the Shopify website, various postal companies, and the US, UK France, Canada Italy, Spain, or Australia can offer you discounted shipping rates if you reside in any of these countries. The discounts can be as high as 88 percent, depending on the plan.
11. Set up your tax rates
Most merchants are required to charge Sales Tax and Value Added Tax on the purchase of their products. Tax rules vary widely by country. It’s best to consult a tax expert for advice on how you can configure your store.
Shopify can calculate taxes automatically for certain jurisdictions. This feature is useful for merchants who want to speed up the tax setup.
Other tax rates will need to be set in a manual manner.
Settings > Duties and Taxes will take you to the Shopify dashboard where the tax settings are located.
Tax and duties settings in Shopify
In the tax settings section you will be able to specify the way you wish to charge tax. For example, you may specify whether shipping rates should include tax or not. ).
It’s always best to consult a tax expert or accountant before setting up these rules. You can also take a look at Shopify’s official documentation about tax rates.
12. Choose a payment gateway for your store
You will need to select a Payment Gateway in order to accept payments online for your products. It is the software used to process credit card transactions made in your store.
Shopify has its own payment gateway, Shopify payments. Shopify Payments is the fastest payment processor for many merchants to start with. It’s also the only one that doesn’t charge transaction fees.
Shopify Payments are available only in certain countries. If you reside in a non-supported location, then you will need to utilize a third party payment gateway.
Follow the instructions to enable a payment portal by going to Settings and clicking Payments on your Shopify dashboard.
Setting up Shopify Payments
13. Connect your domain
You’ve now completed the steps necessary to make your Shopify store available. If you wish, you can publish your store right away using the URL created when you started your free trial.
It’s usually better to use a customized domain, i.e. yoursitename.com. It will be much easier to brand your store and it will also make your visitors more trusting of your website.
If you haven’t already registered a domain, there are two options:
- is available from domain name providers, such as Namecheap Gandi Network Solutions, etc. ).
- directly from Shopify.
Choose a registrar that is reputable. It’s important to choose one that supports two-factor authentication.
It’s a great way to protect your domain, one of your most valuable assets! — secure.
When you use Shopify to purchase a domain, the process of connecting your domain to your shop will be much easier. You will only need to click a button on your own Shopify admin interface.
This approach has the downside that all of your eggs will be in one basket. Your content management system, your hosting and your domain will be all associated with a single account. Some users keep their Shopify and domain names separate because they are worried about losing access.
You can start the domain connection process in Shopify’s dashboard under Settings > Domains.
Shopify allows you to connect your custom domain name.
Click the “buy new domain” button on Shopify and follow the provided instructions.
Follow the instructions again if you are connecting an existing domain.
You’ll need to login to the dashboard of your registrar and make some DNS (domain name settings) changes to point your Shopify store.
For more details, you can read Shopify’s guide on connecting domains.
14. Prepare your store for launch
You can launch your own online store immediately after connecting your domain!
It’s better to make sure that your shop is working properly before you launch it. That’s why a Shopify Launch Checklist can be useful.
Checking off the Shopify checklist usually involves:
- You can check that payments are accepted by running a test order in your Shopify store.
- The shipping and sales tax options work as expected
- All product data entered correctly
- All copy is factually correct, grammatically accurate and free of errors.
- There are no broken links in your store
- You have all the necessary legal notices (including, if needed, a GDPR/CCPA compliant banner for cookie consent)
- Any contact form will send emails to the correct address
- Order Notifications have been customized for your processes
- You have added an icon to your Shopify Store. This is a small icon that represents your company at the top of the browser and in search engine results.
- You have enabled two-factor verification in Shopify . This will secure your account and make it harder to hack.
After you have completed your pre-launch tests, you can remove your password and publish your store. To do this, go to Store Online > Preferences. Scroll down to the section titled “Password Protection”.
Removing password protection to launch your Shopify store
It’s done! You’re now ready to sell!
How can you make your new store a success?
15. Develop your Shopify store further
It’s easy to assume that once your Shopify store goes live, your ecommerce journey has ended. Remember, this is just the beginning and if it was a brick and mortar store, you would always think of new things to tweak. You can do a number of things to make sure that your new Shopify ecommerce store is promoted, profitable and attracts new customers.
Add additional sales channels. This post has shown you how to set up shopify store a stand-alone online shop. Shopify allows you to connect your website with many other platforms including Amazon Etsy eBay and Twitter (US only for now). You can expand your reach by listing your products across these platforms, which all have large user bases. Find out more about Shopify’s other sales channels.
- SEO is search engine optimization and is important for a Shopify site to get good results.
- Use content marketing. Use the built-in blog feature in Shopify to create great content that will attract people to your store. Blogging is an excellent way to drive organic traffic. You can find out how to get the most from it.
Use apps to enhance your shopify online store. There are many apps and integrations available in the Shopify App Store that will allow you to add new features to your website. You’ll find everything from dropshipping to analytics apps in the Shopify app store.
- Online advertising can drive sales. PPC services such as Google Ads, and social networks such as Facebook provide a variety of sophisticated methods to target and retarget niche audiences who will most likely be receptive towards your products. You can find out more about Shopify and online advertising here.
It’s your turn! Have any questions about how to create a Shopify shop?
We hope that you enjoyed and found our article on how to create a Shopify Store useful. Have any questions? Please leave your questions in the comment section. All queries are read and we will try to answer them. Get started with your free Shopify trial here.

- Tags:
- shopify

1 Comment
Comments are closed.